
Navigating the Depths: A Comprehensive Guide to the Subnautica Zone Map
Related Articles: Navigating the Depths: A Comprehensive Guide to the Subnautica Zone Map
Introduction
With enthusiasm, let’s navigate through the intriguing topic related to Navigating the Depths: A Comprehensive Guide to the Subnautica Zone Map. Let’s weave interesting information and offer fresh perspectives to the readers.
Table of Content
Navigating the Depths: A Comprehensive Guide to the Subnautica Zone Map
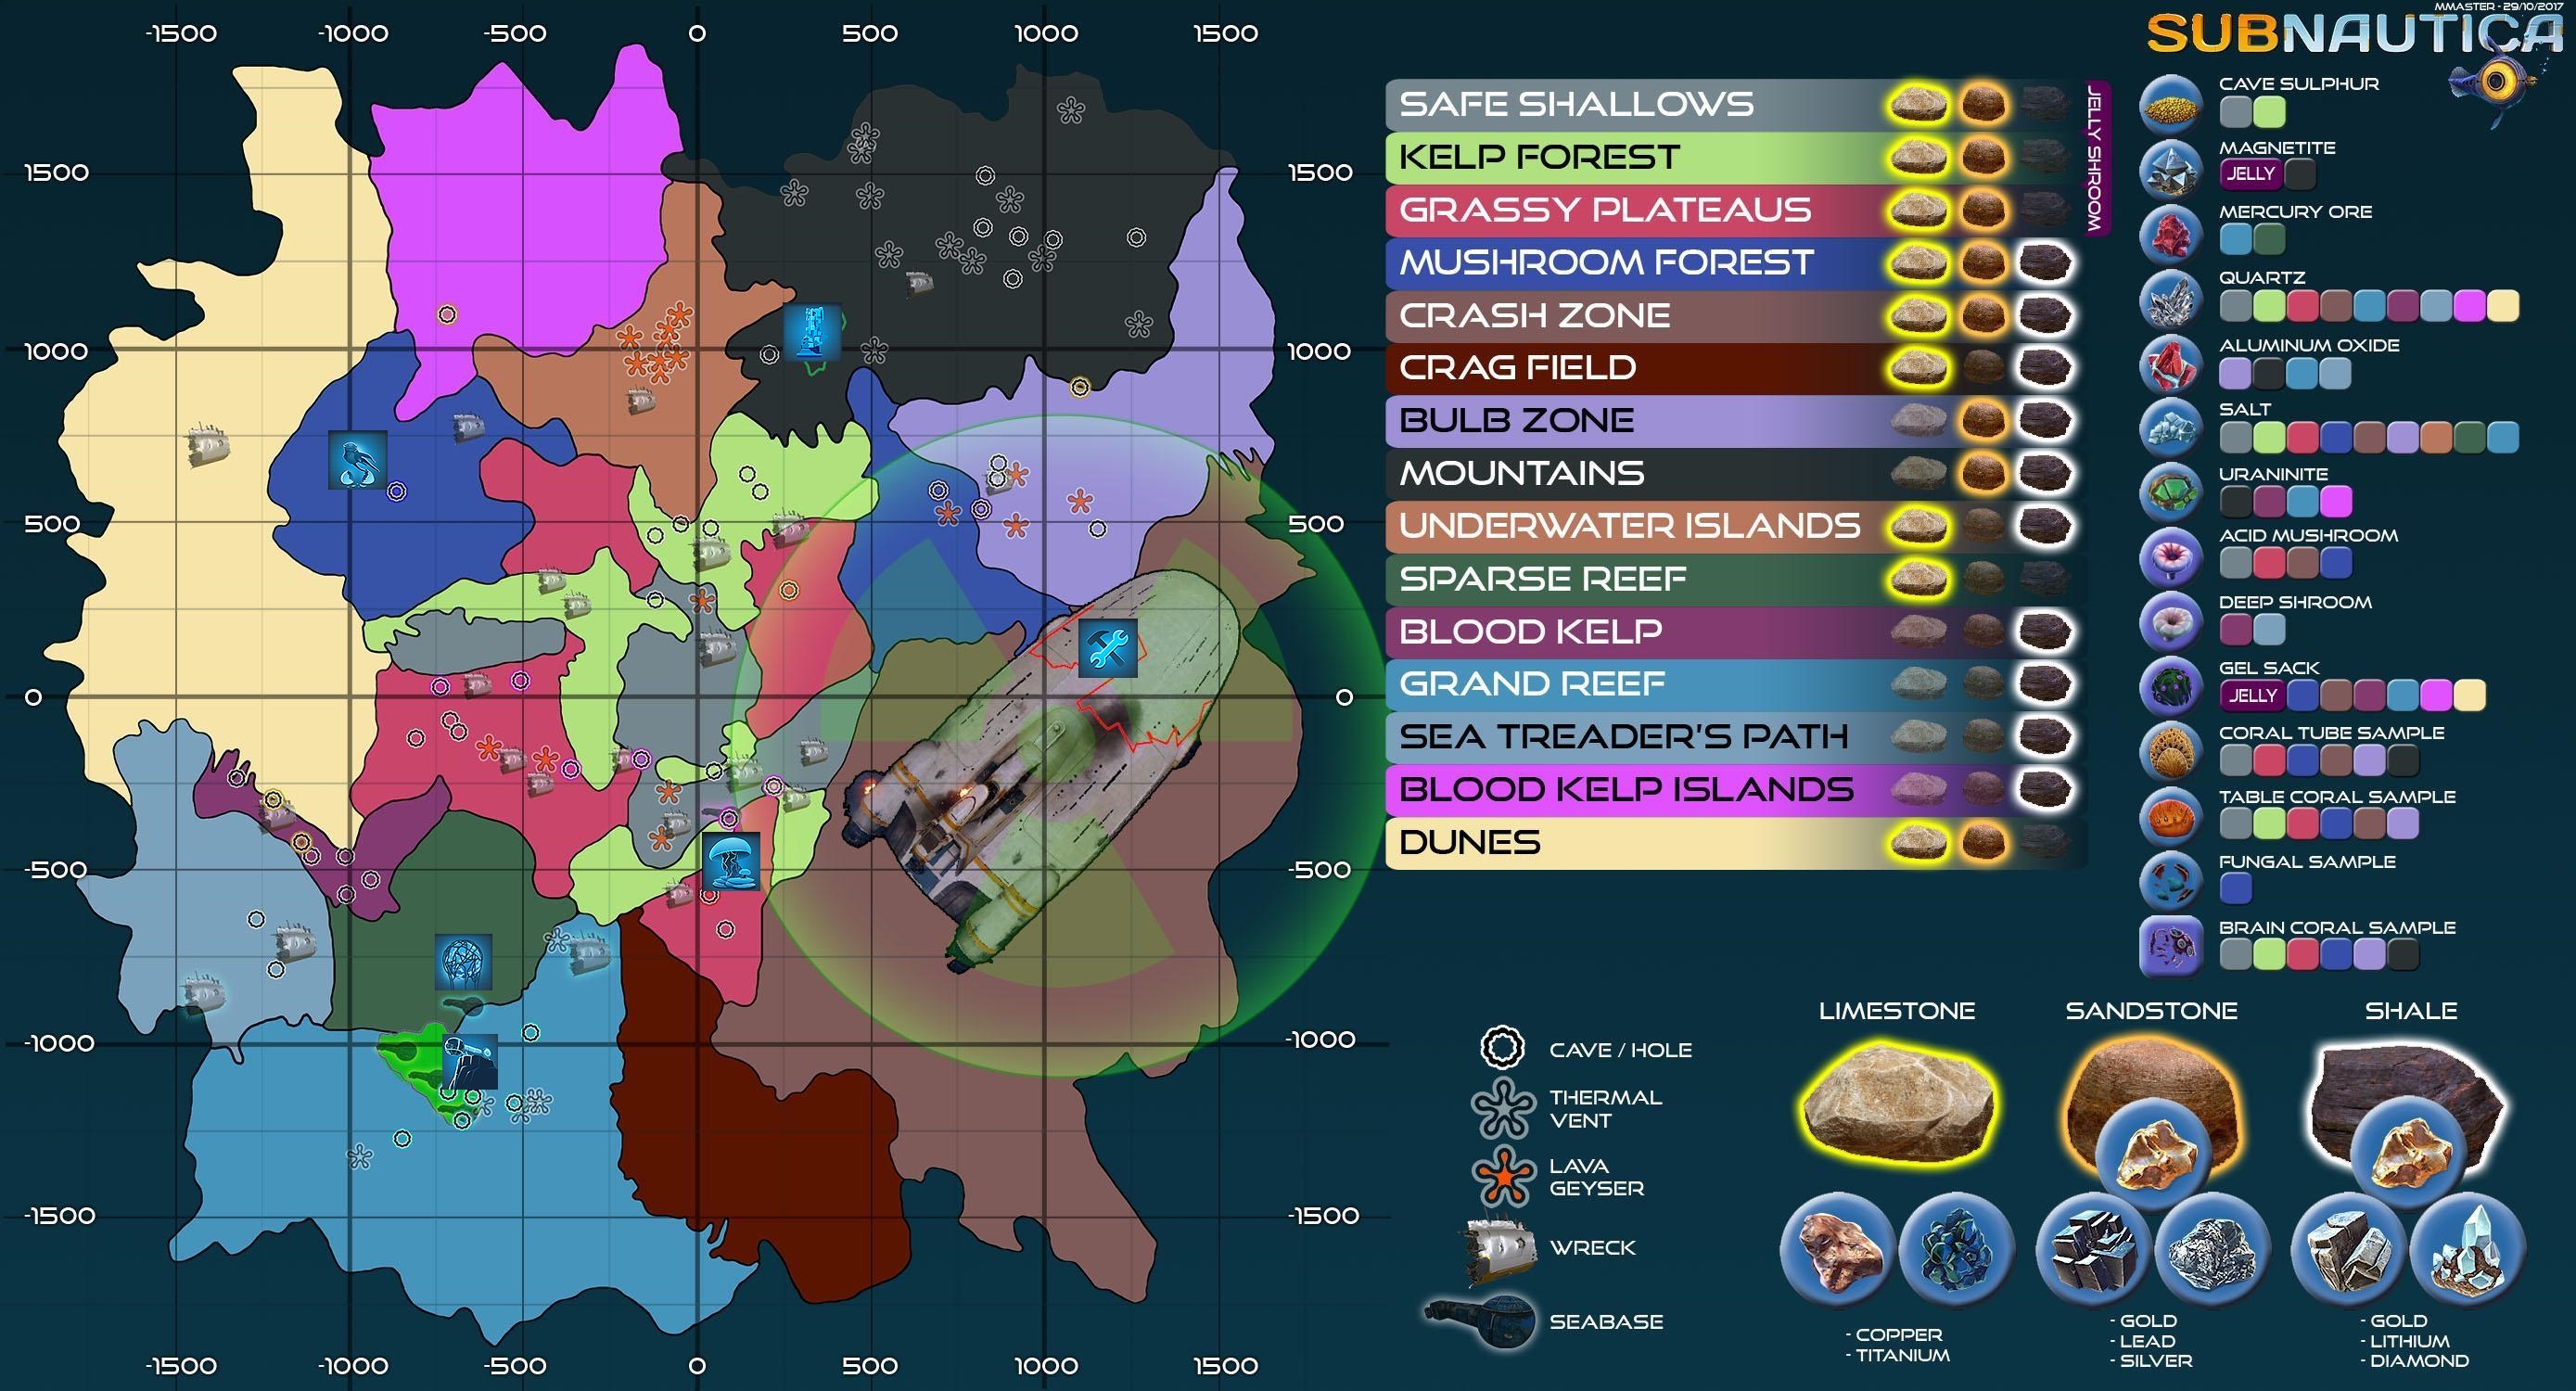
Subnautica, the acclaimed underwater survival adventure game, presents players with a vast and intricate world teeming with life, both friendly and hostile. To thrive in this alien ocean, understanding the layout of the game’s different biomes is crucial. This guide delves into the intricacies of the Subnautica zone map, providing a comprehensive overview of each distinct region and its unique characteristics.
The Importance of the Zone Map
The Subnautica zone map is more than just a visual representation of the game’s environment. It serves as a vital tool for players, offering a roadmap for exploration, resource acquisition, and survival. By understanding the location of specific biomes and their associated resources, players can optimize their strategies for crafting, building, and navigating the dangers of the deep.
Delving into the Depths: A Biome-by-Biome Exploration
1. The Shallow Reef:
- Location: The shallowest region, often the starting point for players.
- Characteristics: Sunlit waters, diverse coral reefs, abundant marine life, including kelp forests and grassy plains.
- Resources: Seaglide parts, basic building materials, and food sources like fish and kelp.
- Notable Features: The Aurora wreckage, the source of the game’s initial distress signal.
2. The Safe Shallows:
- Location: Located near the Aurora wreckage, deeper than the Shallow Reef.
- Characteristics: Rich in diverse coral formations, featuring a mix of shallow and deeper waters.
- Resources: Advanced building materials, including titanium, copper, and silver.
- Notable Features: The iconic "Mushroom Forest" with its bioluminescent fungi.
3. The Kelp Forest:
- Location: A vast underwater forest extending from the Safe Shallows to deeper regions.
- Characteristics: Dense kelp forests providing cover and protection from predators.
- Resources: Kelp, a crucial ingredient for crafting and survival, and various fish species.
- Notable Features: The presence of the Reefback, a gentle giant of the ocean, and the imposing Reaper Leviathan.
4. The Grassy Plateaus:
- Location: Located at a moderate depth, featuring grassy plains and scattered rock formations.
- Characteristics: A transition zone between shallow and deeper regions, offering diverse resources.
- Resources: Various minerals, including lithium, and a variety of fish species.
- Notable Features: The presence of the "Cuddlefish" and the "Peeper" creatures.
5. The Mushroom Forest:
- Location: A distinct region within the Safe Shallows, characterized by bioluminescent fungi.
- Characteristics: Offers a unique visual experience and harbors a variety of resources.
- Resources: Bioluminescent materials, which are essential for crafting light sources.
- Notable Features: The presence of the "Ampeel" creature, which emits a bright bioluminescent light.
6. The Dunes:
- Location: A region characterized by vast, sandy plains and occasional rock formations.
- Characteristics: Offers a contrast to the coral reefs and kelp forests, with a unique underwater landscape.
- Resources: Sand, a valuable resource for crafting, and a variety of fish species.
- Notable Features: The presence of the "Sand Shark" and the "Bone Shark."
7. The Mountains:
- Location: A mountainous region with steep cliffs and rocky outcroppings.
- Characteristics: Provides a challenging environment for exploration and resource gathering.
- Resources: Various minerals, including quartz, and a variety of fish species.
- Notable Features: The presence of the "Lava Lizard" and the "Ghost Leviathan."
8. The Bulb Zone:
- Location: A region characterized by large, bulbous plant life, often associated with volcanic activity.
- Characteristics: Offers a unique and challenging environment with high temperatures and volcanic vents.
- Resources: Various minerals, including copper, and a variety of fish species.
- Notable Features: The presence of the "Lava Eel" and the "Thermal Vent" creatures.
9. The Lost River:
- Location: A vast underwater cave system with interconnected tunnels and chambers.
- Characteristics: Offers a unique and challenging environment with its own ecosystem and resources.
- Resources: Various minerals, including diamonds, and a variety of fish species.
- Notable Features: The presence of the "Reaper Leviathan" and the "Ghost Leviathan."
10. The Grand Reef:
- Location: A vast and diverse coral reef system, home to a wide array of marine life.
- Characteristics: Offers a breathtaking visual experience and a variety of resources.
- Resources: Various minerals, including titanium, and a variety of fish species.
- Notable Features: The presence of the "Reefback" and the "Reaper Leviathan."
11. The Jellyshroom Caves:
- Location: A network of caves filled with bioluminescent jellyfish and mushroom-like plants.
- Characteristics: Offers a unique and challenging environment with its own ecosystem and resources.
- Resources: Bioluminescent materials and a variety of fish species.
- Notable Features: The presence of the "Jellyshroom" and the "Peeper" creatures.
12. The Blood Kelp Forest:
- Location: A deep-sea forest dominated by blood-red kelp, with a unique and eerie atmosphere.
- Characteristics: Offers a challenging environment with its own ecosystem and resources.
- Resources: Blood Kelp, a valuable resource for crafting, and a variety of fish species.
- Notable Features: The presence of the "Reaper Leviathan" and the "Ghost Leviathan."
13. The Inactive Lava Zone:
- Location: A region with inactive volcanic activity, offering a unique and challenging environment.
- Characteristics: Offers a variety of resources and a unique visual experience.
- Resources: Various minerals, including copper, and a variety of fish species.
- Notable Features: The presence of the "Lava Lizard" and the "Thermal Vent" creatures.
14. The Sparse Reef:
- Location: A region with scattered coral formations and a relatively sparse ecosystem.
- Characteristics: Offers a unique and challenging environment with its own ecosystem and resources.
- Resources: Various minerals, including titanium, and a variety of fish species.
- Notable Features: The presence of the "Reaper Leviathan" and the "Ghost Leviathan."
15. The Crater Edge:
- Location: The edge of a massive underwater crater, offering a unique and challenging environment.
- Characteristics: Offers a variety of resources and a unique visual experience.
- Resources: Various minerals, including quartz, and a variety of fish species.
- Notable Features: The presence of the "Reaper Leviathan" and the "Ghost Leviathan."
16. The Sea Treader’s Path:
- Location: A narrow path through the deep sea, offering a unique and challenging environment.
- Characteristics: Offers a variety of resources and a unique visual experience.
- Resources: Various minerals, including lithium, and a variety of fish species.
- Notable Features: The presence of the "Sea Treader" creature and the "Reaper Leviathan."
17. The Crash Zone:
- Location: The site of the Aurora crash, offering a variety of resources and a unique visual experience.
- Characteristics: Offers a variety of resources and a unique visual experience.
- Resources: Various minerals, including titanium, and a variety of fish species.
- Notable Features: The presence of the "Reaper Leviathan" and the "Ghost Leviathan."
Navigating the Depths: FAQs
1. How do I find specific resources on the map?
The Subnautica zone map provides a general overview of the game’s environment, but for precise resource locations, players need to explore the individual biomes. Some resources, such as titanium and copper, are found in multiple locations, while others, like lithium and quartz, are more specific.
2. Are all biomes safe to explore?
No, some biomes are considerably more dangerous than others. The deeper regions, such as the Lost River and the Blood Kelp Forest, are home to powerful predators like the Reaper Leviathan and the Ghost Leviathan. Players should exercise caution when exploring these areas and be prepared for encounters with these formidable creatures.
3. How do I avoid encounters with hostile creatures?
The Subnautica zone map can help players identify areas with high concentrations of hostile creatures. Players can choose to avoid these areas altogether or be prepared for encounters with these creatures by equipping themselves with appropriate tools and weapons.
4. Are there any safe havens within the game?
Yes, certain areas, like the Mushroom Forest and the Safe Shallows, are generally considered safer than others. These areas are often less populated with hostile creatures and offer a respite from the dangers of the deeper regions.
5. How do I get around the map efficiently?
Players can use various vehicles, such as the Seaglide and the Cyclops, to navigate the vast ocean. The Seaglide is a fast and agile vehicle for traversing short distances, while the Cyclops provides a larger platform for exploration and resource gathering.
Navigating the Depths: Tips for Exploration
- Start Small: Begin by exploring the Shallow Reef and the Safe Shallows, gradually venturing into deeper regions as you gain experience and resources.
- Plan Your Routes: Use the Subnautica zone map to plan your exploration routes, taking into account the location of resources, hostile creatures, and potential hazards.
- Be Prepared: Equip yourself with appropriate tools and weapons before venturing into dangerous areas.
- Don’t Rush: Take your time to explore and observe the environment, learning the behavior of creatures and the locations of valuable resources.
- Utilize Your Vehicles: Use vehicles like the Seaglide and the Cyclops to efficiently traverse the vast ocean and reach remote locations.
- Be Aware of Your Surroundings: Pay attention to the environment and the creatures around you, as even seemingly harmless creatures can pose a threat.
- Don’t Be Afraid to Experiment: Try different approaches and strategies to find what works best for you.
Navigating the Depths: Conclusion
The Subnautica zone map is an invaluable tool for players seeking to explore and thrive in the game’s underwater world. By understanding the layout of the different biomes and their associated resources, players can optimize their strategies for exploration, resource acquisition, and survival. Whether venturing into the depths of the Lost River or navigating the treacherous Blood Kelp Forest, the zone map serves as a guide, helping players navigate the challenges and embrace the wonders of Subnautica’s vast and intricate ocean.


.jpg/revision/latest?cb=20150618134419)


Closure
Thus, we hope this article has provided valuable insights into Navigating the Depths: A Comprehensive Guide to the Subnautica Zone Map. We appreciate your attention to our article. See you in our next article!